[출처] http://cafe.naver.com/sf2dark.cafe?iframe_url=/ArticleRead.nhn%3Farticleid=11
VM->Setting->HardDisk->Add->8GB->name set(b,c,d,e,f,g 등 6개 디스크 생성)
root/oracle 로그인
부팅 완료후 버전 확인
[root@ocp ~]# uname -rm
2.6.9-42.ELsmp i686
VM->Setting->Options->Shared Folders->Add->Next->공유된 폴더 연결, 이름지정->Next->Finish
->Forder Sharing->Always enabled (check)->OK
[root@ocp hgfs]# cd /mnt/hgfs/shared/
오라클 사이트에서 ASM 패키지 다운로드
http://www.oracle.com/technology/software/tech/linux/asmlib/rhel4.html
패키지 저장할 디렉토리 생성
[root@ocp shared]# mkdir /asm/
패키지를 /asm 디렉토리로 복사
[root@ocp shared]#cp *.rpm /asm/
패키지 설치
[root@ocp shared]# cd /asm/
/asm/에서 확인
[root@ocp asm]# ll
total 184
-rwxr-xr-x 1 root root 129218 May 11 01:44 oracleasm-2.6.9-42.ELsmp-2.0.3-1.i686.rpm
-rwxr-xr-x 1 root root 12948 May 11 01:44 oracleasmlib-2.0.2-1.i386.rpm
-rwxr-xr-x 1 root root 22662 May 11 01:44 oracleasm-support-2.0.3-1.i386.rpm
순서대로 설치
[root@ocp asm]# rpm -Uvh oracleasm-support-2.0.3-1.i386.rpm
Preparing... ########################################### [100%]
[root@ocp asm]# rpm -Uvh oracleasm-2.6.9-42.ELsmp-2.0.3-1.i686.rpm
Preparing... ########################################### [100%]
[root@ocp asm]# rpm -Uvh oracleasmlib-2.0.2-1.i386.rpm
Preparing... ########################################### [100%]
ASM 구성 설정
[root@ocp asm]# /etc/init.d/oracleasm configure
Configuring the Oracle ASM library driver.
This will configure the on-boot properties of the Oracle ASM library
driver. The following questions will determine whether the driver is
loaded on boot and what permissions it will have. The current values
will be shown in brackets ('[]'). Hitting <ENTER> without typing an
answer will keep that current value. Ctrl-C will abort.
Default user to own the driver interface []: oracle
Default group to own the driver interface []: dba
Start Oracle ASM library driver on boot (y/n) [n]: y
Fix permissions of Oracle ASM disks on boot (y/n) [y]: y
Writing Oracle ASM library driver configuration: [ OK ]
Creating /dev/oracleasm mount point: [ OK ]
Loading module "oracleasm": [ OK ]
Mounting ASMlib driver filesystem: [ OK ]
Scanning system for ASM disks: [ OK ]
ASM 활성화
[root@ocp asm]# /etc/init.d/oracleasm enable
Writing Oracle ASM library driver configuration: [ OK ]
Scanning system for ASM disks: [ OK ]
터미널 창 open 아래와 같은 작업 진행.
파티션 설정
[root@ocp ~]# fdisk /dev/sdb
Device contains neither a valid DOS partition table, nor Sun, SGI or OSF disklabel
Building a new DOS disklabel. Changes will remain in memory only,
until you decide to write them. After that, of course, the previous
content won't be recoverable.
The number of cylinders for this disk is set to 1044.
There is nothing wrong with that, but this is larger than 1024,
and could in certain setups cause problems with:
1) software that runs at boot time (e.g., old versions of LILO)
2) booting and partitioning software from other OSs
(e.g., DOS FDISK, OS/2 FDISK)
Warning: invalid flag 0x0000 of partition table 4 will be corrected by w(rite)
Command (m for help): n
Command action
e extended
p primary partition (1-4)
p
Partition number (1-4): 1
First cylinder (1-1044, default 1):
Using default value 1
Last cylinder or +size or +sizeM or +sizeK (1-1044, default 1044):
Using default value 1044
Command (m for help): w
The partition table has been altered!
Calling ioctl() to re-read partition table.
Syncing disks.
[root@ocp ~]# fdisk /dev/sdc
.
.
[root@ocp ~]# fdisk /dev/sdd
파티션 확인
[root@ocp ~]# fdisk /dev/sdb
The number of cylinders for this disk is set to 1044.
There is nothing wrong with that, but this is larger than 1024,
and could in certain setups cause problems with:
1) software that runs at boot time (e.g., old versions of LILO)
2) booting and partitioning software from other OSs
(e.g., DOS FDISK, OS/2 FDISK)
Command (m for help): p
Disk /dev/sdb: 8589 MB, 8589934592 bytes
255 heads, 63 sectors/track, 1044 cylinders
Units = cylinders of 16065 * 512 = 8225280 bytes
Device Boot Start End Blocks Id System
/dev/sdb1 1 1044 8385898+ 83 Linux
Command (m for help): q
파일시스템 생성
[root@ocp ~]# mke2fs -j /dev/sdb1
mke2fs 1.35 (28-Feb-2004)
Filesystem label=
OS type: Linux
Block size=4096 (log=2)
Fragment size=4096 (log=2)
1048576 inodes, 2096474 blocks
104823 blocks (5.00%) reserved for the super user
First data block=0
Maximum filesystem blocks=2147483648
64 block groups
32768 blocks per group, 32768 fragments per group
16384 inodes per group
Superblock backups stored on blocks:
32768, 98304, 163840, 229376, 294912, 819200, 884736, 1605632
Writing inode tables: done
Creating journal (8192 blocks): done
Writing superblocks and filesystem accounting information: done
This filesystem will be automatically checked every 25 mounts or
180 days, whichever comes first. Use tune2fs -c or -i to override.
ASM 디스크 구성
[root@ocp dev]# /etc/init.d/oracleasm createdisk VOL1 /dev/sdb1
Marking disk "/dev/sde1" as an ASM disk: [ OK ]
[root@ocp dev]# /etc/init.d/oracleasm createdisk VOL2 /dev/sdc1
Marking disk "/dev/sdf1" as an ASM disk: [ OK ]
[root@ocp dev]# /etc/init.d/oracleasm createdisk VOL3 /dev/sdd1
Marking disk "/dev/sdg1" as an ASM disk: [ OK ]
구성확인
[root@ocp dev]# /etc/init.d/oracleasm listdisks
VOL1
VOL2
VOL3
root 사용자 로그 오프
oracle 사용자로 로그인후 터미널창 에서
[oracle@ocp ~]$ . .bash_profile
ocp@orcl : /home/oracle> dbca
0. Welcome -> Next
1. operations -> Create a Database -> Next
2. Database Templates -> General Purpose -> Next
3. Database Identification -> orcl2 -> Next
4. Management Options -> Next
5. Database Credentials -> Password 설정(oracle) -> Next
6. Storage Options -> ASM -> Next
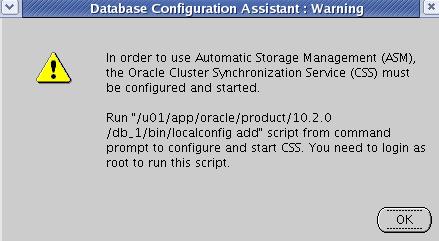
터미널창 열기
ocp@orcl : /home/oracle> su -
Password:oracle
[root@ocp ~]# /u01/app/oracle/product/10.2.0/db_1/bin/localconfig add
/etc/oracle does not exist. Creating it now.
Successfully accumulated necessary OCR keys.
Creating OCR keys for user 'root', privgrp 'root'..
Operation successful.
Configuration for local CSS has been initialized
Adding to inittab
Startup will be queued to init within 90 seconds.
Checking the status of new Oracle init process...
Expecting the CRS daemons to be up within 600 seconds.
CSS is active on these nodes.
ocp
CSS is active on all nodes.
Oracle CSS service is installed and running under init(1M)
[root@ocp ~]#exit
-> OK -> Next
7. Create ASM Instance -> ASM Password 설정(oracle) -> Next
- DBCA가 ASM 시작 -> OK ->
- ASM Disk Groups -> Next ->
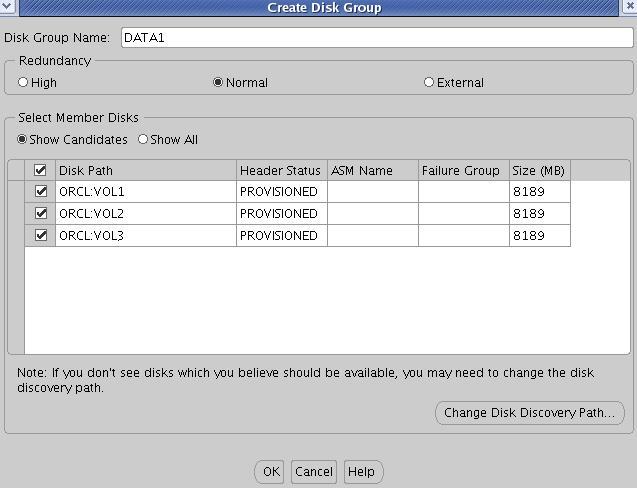
- ASM Disk Groups -> Create New
- Create Disk Group -> Disk Group Name: DATA1
- High: 데이타를 2중으로 미러링
- Normal: 기본적인 미러링
- External: ASM의 디스크를 미러링 하지 않음, 하드웨어 RAID Array 구성된 경우에 사용. - Change Disk Discovery Path -> ORCL:* -> OK

- DISK 모두 선택 -> OK
- ASM Disk Groups -> 체크박스를 클릭 -> Next
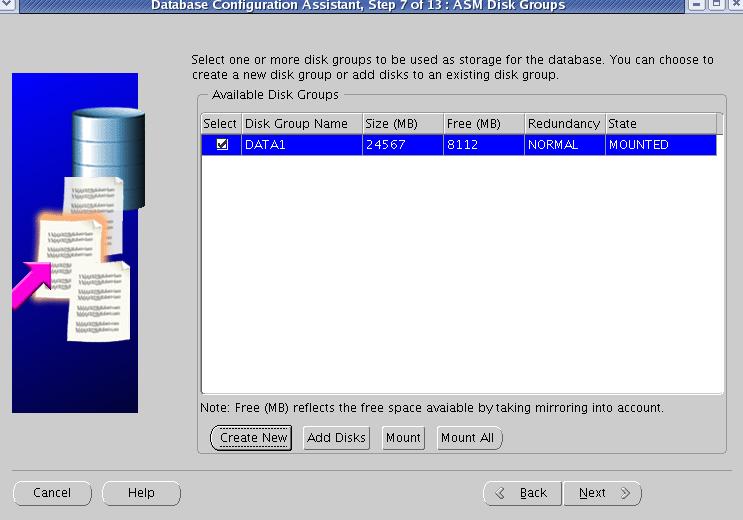
8. Database File Locations -> Use Oracle-Managed Files: +DATA1 확인 -> Next
9. Recovery Configuration
Specify Flash Recovery Area를 선택합니다.
- Flash Recovery Area: +DATA1
- Flash Recovery Area Size: 2048
- Enable Archiving 체크
-> Next
10. Database Content
Sample Schemas 체크 -> Next
Language->KO16MSWIN949
Date->Korea
11. Initialization Parameters -> Next
12. Database Storage -> Next
13. Creation Options -> Create Database 체크 -> Finish
Confirmation -> Database Details -> OK
DB 설치
Enterprise Manager URL을 확인 -> Exit
'OraclE' 카테고리의 다른 글
| ORA-29275 : 부분 다중 바이트 문자 (0) | 2009.09.07 |
|---|---|
| LOCAL_LISTENER and ORA-12545 (0) | 2009.09.06 |
| 오라클 암호화 복호화 초간단 예제(dbms_obfuscation_toolkit 편) (1) | 2009.08.28 |
| Oradim Utility (0) | 2009.08.07 |
| Oracle10g R2부터 Group By절에 의한 자동정렬이 안되는 이유 (0) | 2009.06.12 |