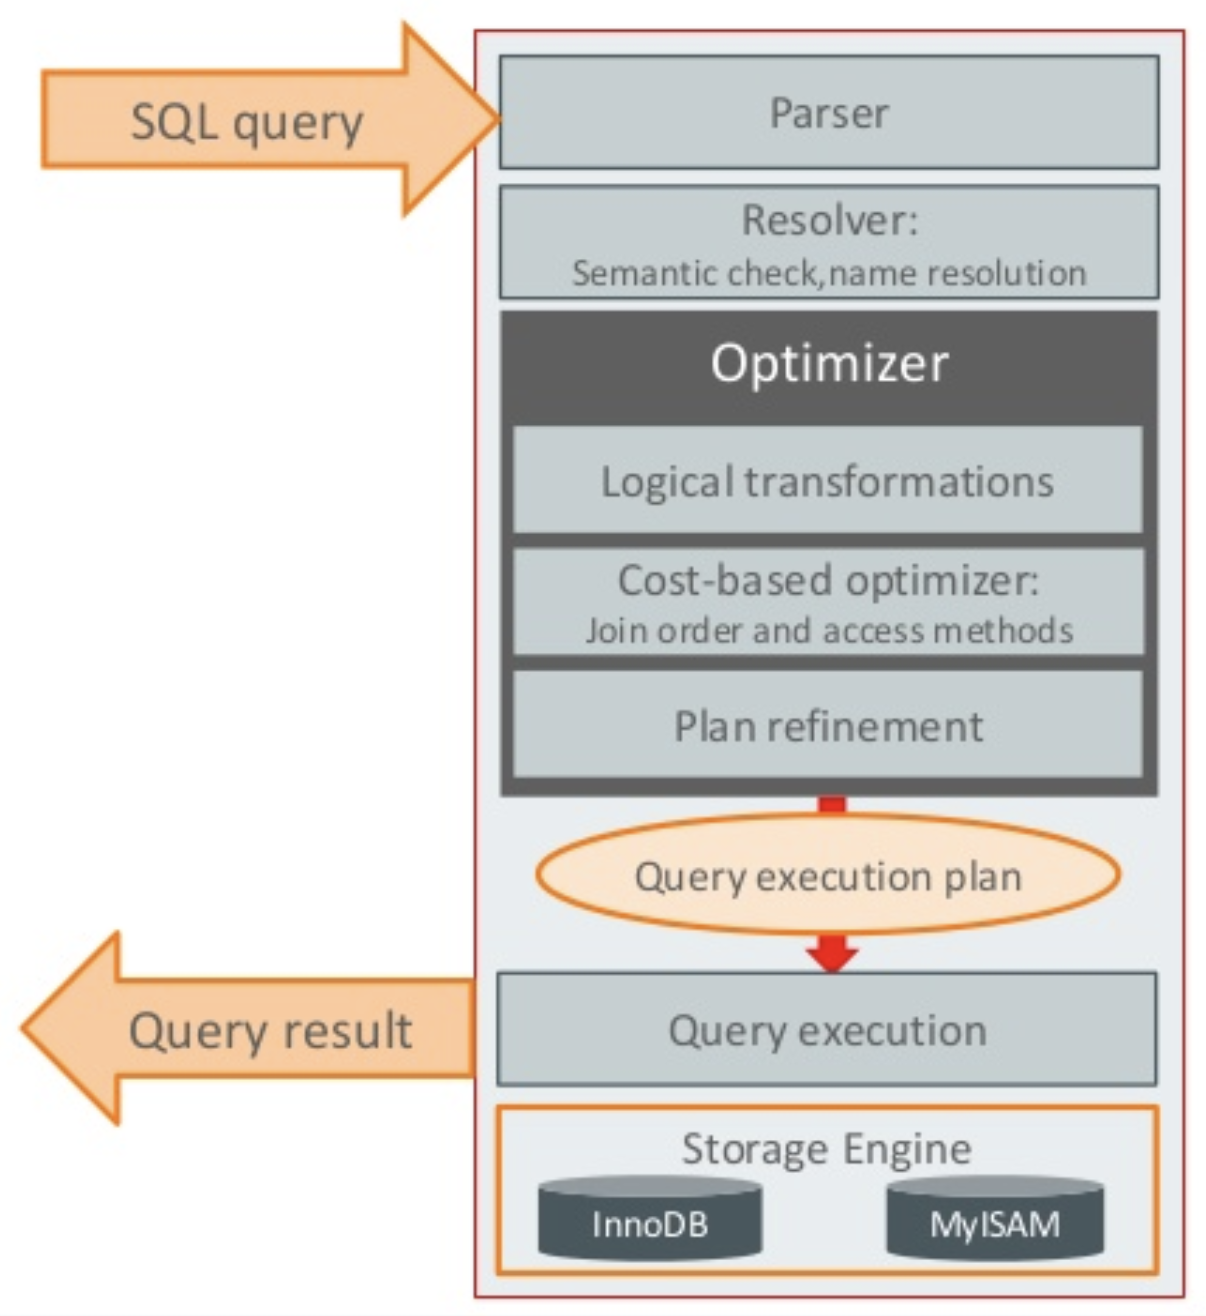
옵티마이저의 판단을 알기 위한 방법으로 explain 명령어를 사용한다. 하지만 explain은 옵티마이저가 최종적으로 선택한 실행 계획 뿐이고, 그 과정에 최적화나 비용 계산, 또는 실행 계획의 비교가 어떻게 일어 났는지는 알 수 없다. 옵티마이저 트레이스에는 이러한 내용이 설명 되어있다.
| mysql> explain select * from t1 join t3 on (t1.c1=t3.pk and t3.pk < 113); +----+-------------+-------+------------+-------+---------------+---------+---------+------+------+----------+----------------------------------------------------+ | id | select_type | table | partitions | type | possible_keys | key | key_len | ref | rows | filtered | Extra | +----+-------------+-------+------------+-------+---------------+---------+---------+------+------+----------+----------------------------------------------------+ | 1 | SIMPLE | t3 | NULL | range | PRIMARY | PRIMARY | 4 | NULL | 2 | 100.00 | Using where | | 1 | SIMPLE | t1 | NULL | ALL | NULL | NULL | NULL | NULL | 10 | 10.00 | Using where; Using join buffer (Block Nested Loop) | +----+-------------+-------+------------+-------+---------------+---------+---------+------+------+----------+----------------------------------------------------+ 2 rows in set, 1 warning (0.00 sec) |
옵티마이저 트레이스의 사용법은 간단하다.
- 옵티마이저 트레이스를 활성화한다.
- 해석하고 싶은 쿼리를 실행한다.
- 트레이스를 출력한다.
SQL을 수행하면 아래 그림처럼 진행이 되는데, 옵티마이저 트레이스를 출력하면 옵티마이저가 하는 역할을 그대로 확인 할 수 있다.

실행 계획은 information_schema에서 json 형식으로 볼 수 있다.
| select * from inforamtion_schema.optimizer_trace\G; |
옵티마이저 트레이스를 제어하는 시스템 변수를 확인 하자.
세션 변수이므로 그냥 변경하면 현재 세션에만 적용 된다.

- 옵티마이저 트레이스의 활성화/ 비활성화
set optimizer_trace='enabled=on';
set optimizer_trace='enabled=off';
- 옵티마이저 트레이스 최대 저장 갯수 변경
SET optimizer_trace_offset=-2, optimizer_trace_limit=5; << 마지막 2개 수생된거 부터 5개 저장
SET optimizer_trace_offset=0, optimizer_trace_limit=5; << 마지막 수행된거 부터 5개 저장 (추천, limit 값만 조절 할 것)
※ 최대 출력 갯수는 optimizer_trace_max_mem_size 의 영향을 받는다.
- 옵티마이저 트레이스 다중 출력
select * from information_schema.optimizer_trace ; << 순서대로 모두 출럭 (추천)
select * from information_schema.optimizer_trace limit 1 ; << 1번째 1개 출력
select * from information_schema.optimizer_trace limit 1 offset 1 ; << 2번째 1개 출력
select * from information_schema.optimizer_trace limit 2 offset 0 ; << 1번째 부터 2개 출력
select * from information_schema.optimizer_trace limit 2 offset 1 ; << 2번째 부터 2개 출력
select * from information_schema.optimizer_trace limit 2 offset 2 ; << 3번째 부터 2개 출럭
쿼리를 수행하고 트레이스를 확인 해 보았다.
출력되는 결과가 너무 길어서 잘라서 보자.
| mysql> select * from information_schema.optimizer_trace\G; *************************** 1. row *************************** QUERY: select * from t1 join t3 on (t1.c1=t3.pk and t3.pk < 113) TRACE: { "steps": [ { "join_preparation": { "select#": 1, "steps": [ { "expanded_query": "/* select#1 */ select `t1`.`c1` AS `c1`,`t1`.`c2` AS `c2`,`t3`.`pk` AS `pk`,`t3`.`i` AS `i` from (`t1` join `t3` on(((`t1`.`c1` = `t3`.`pk`) and (`t3`.`pk` < 113))))" }, { "transformations_to_nested_joins": { "transformations": [ "JOIN_condition_to_WHERE", "parenthesis_removal" ], "expanded_query": "/* select#1 */ select `t1`.`c1` AS `c1`,`t1`.`c2` AS `c2`,`t3`.`pk` AS `pk`,`t3`.`i` AS `i` from `t1` join `t3` where ((`t1`.`c1` = `t3`.`pk`) and (`t3`.`pk` < 113))" } } ] } }, |
QUERY 컬럼을 통해 실제 입력된 쿼리를 알 수 있다.
join_preparation 의 select# 은 explain의 id와 동일한 값이다.
join_preparation 의 transformations_to_nested_joins 에서 쿼리의 실행 계획을 찾기 전에 쿼리를 완전한 형태로 열어 조인문의 on 절에 있는 조건을 where 절로 이동 시킨다.
| { "join_optimization": { "select#": 1, "steps": [ { "condition_processing": { "condition": "WHERE", "original_condition": "((`t1`.`c1` = `t3`.`pk`) and (`t3`.`pk` < 113))", "steps": [ { "transformation": "equality_propagation", "resulting_condition": "((`t3`.`pk` < 113) and multiple equal(`t1`.`c1`, `t3`.`pk`))" }, { "transformation": "constant_propagation", "resulting_condition": "((`t3`.`pk` < 113) and multiple equal(`t1`.`c1`, `t3`.`pk`))" }, { "transformation": "trivial_condition_removal", "resulting_condition": "((`t3`.`pk` < 113) and multiple equal(`t1`.`c1`, `t3`.`pk`))" } ] } }, |
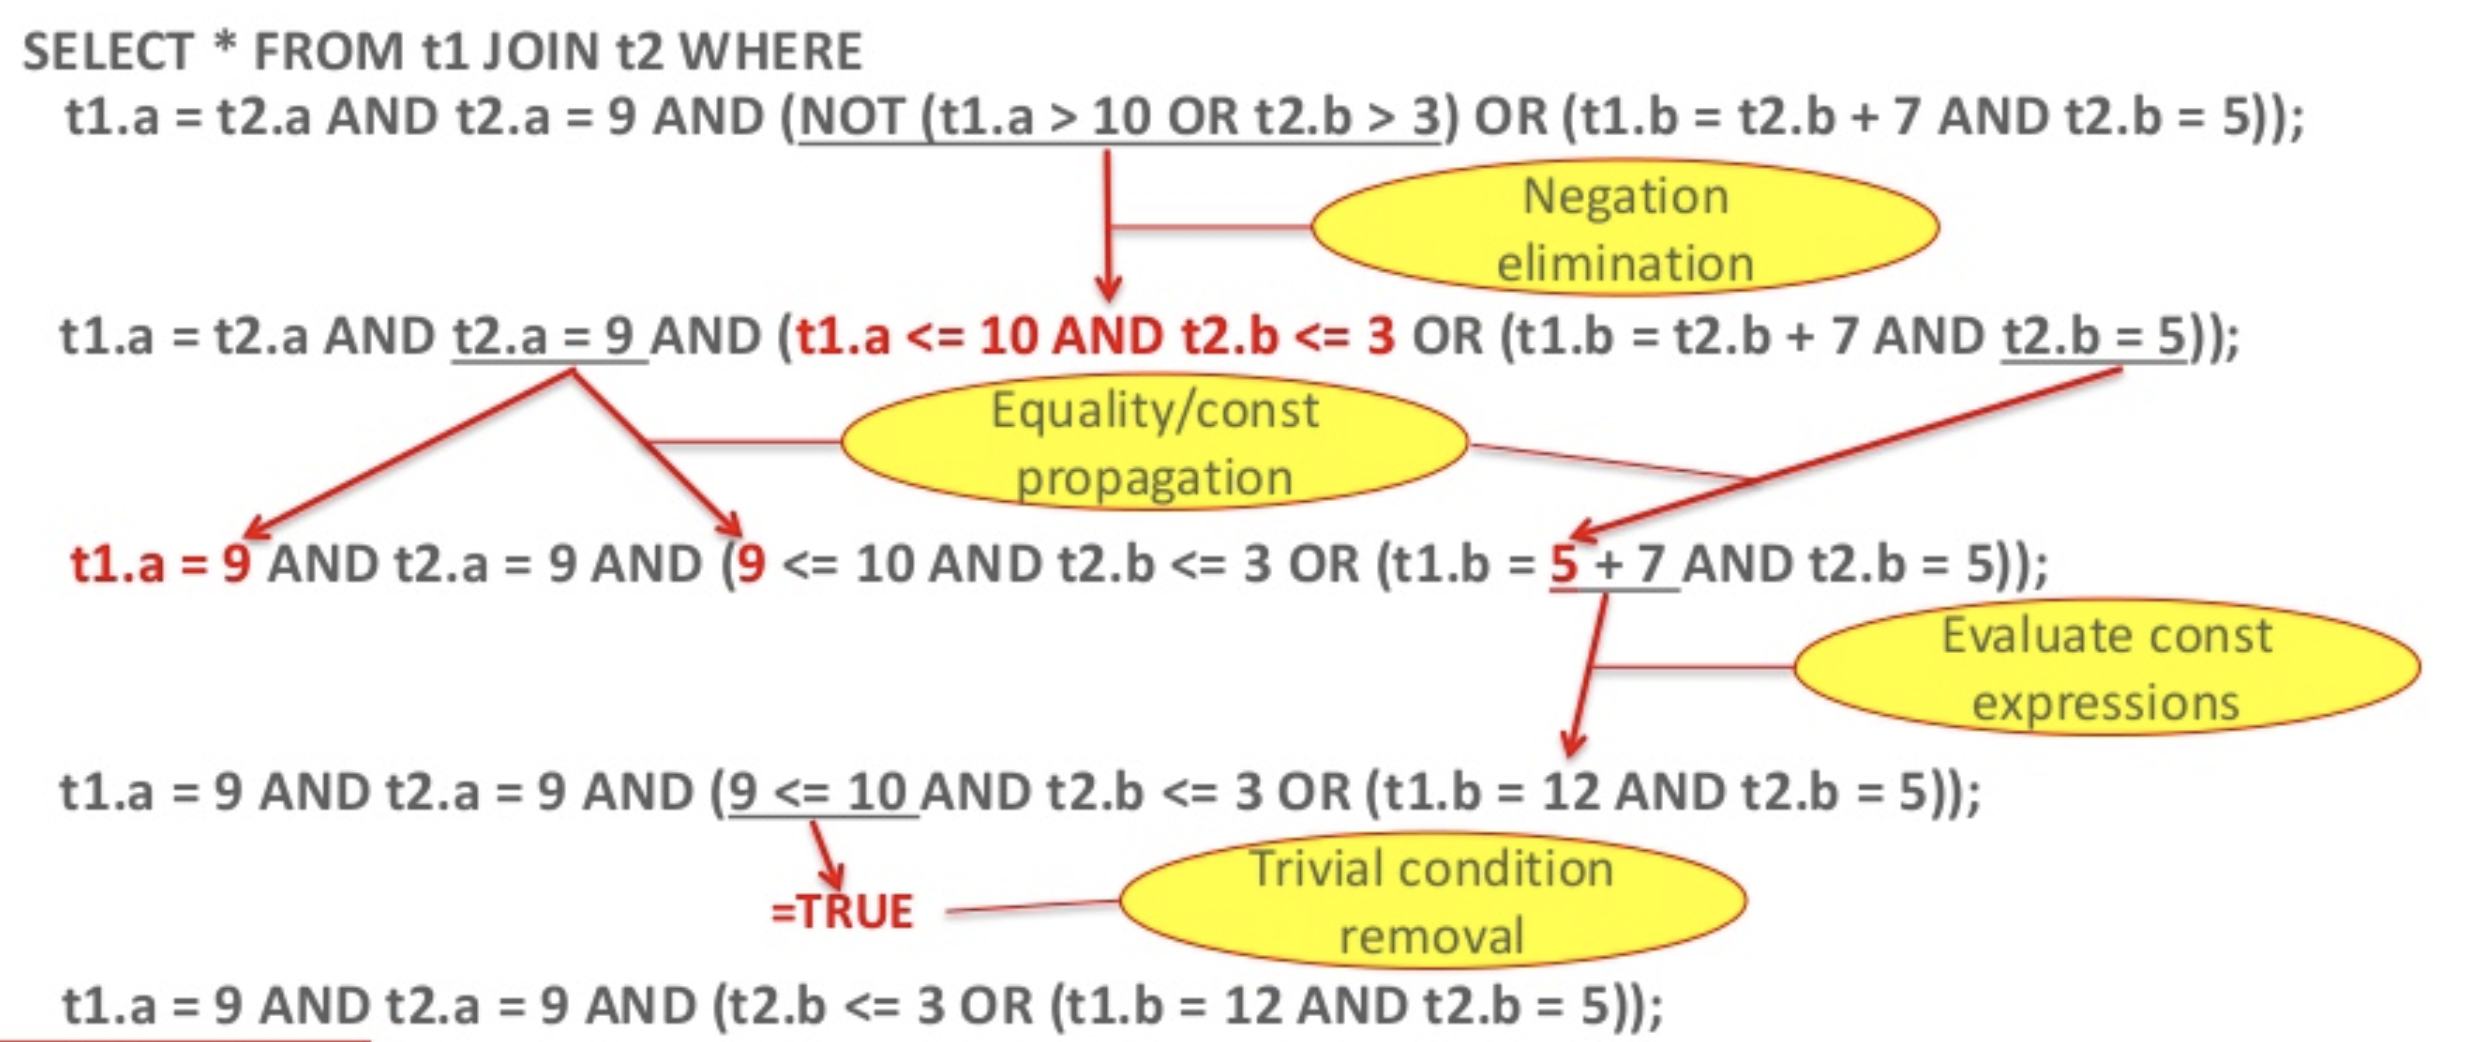
join_optimization 의 처음 단계는 where 절의 변환이다.원래 on 절에 지정되어 있던 것들 중 불필요한 조건을 제거한 후 옵티마이저가 해석하기 쉬운 형태로 변경 한다. 3개의 변환 알고리즘이 적용 되었다.
equality_propagation(등가 비교에 의한 추이율)을 적용한 결과 c1, pk 컬럼이 같은 값이라고 판단하여 같은 그룹(multiple equal)으로 합쳐졌다.
constant_propagation(정수의 등가 비교에 의한 추이)나 trivial_condition_removal(자명한 조건의 삭제) 조건이 포함 되지 않아 변환은 일어나지 않았다. trivial_condition_removal에서는 만일 where...and 1=1 같은 불필요한 조건이 포함되어 있을 경우 삭제 된다.
위의 과정을 좀 자세히 보면 다음과 같다.

| { "substitute_generated_columns": { } }, { "table_dependencies": [ { "table": "`t1`", "row_may_be_null": false, "map_bit": 0, "depends_on_map_bits": [ ] }, { "table": "`t3`", "row_may_be_null": false, "map_bit": 1, "depends_on_map_bits": [ ] } ] }, { "ref_optimizer_key_uses": [ { "table": "`t3`", "field": "pk", "equals": "`t1`.`c1`", "null_rejecting": true } ] }, { "rows_estimation": [ { "table": "`t1`", "table_scan": { "rows": 10, "cost": 0.25 } }, { "table": "`t3`", "range_analysis": { "table_scan": { "rows": 4, "cost": 2.75 }, "potential_range_indexes": [ { "index": "PRIMARY", "usable": true, "key_parts": [ "pk" ] } ], "setup_range_conditions": [ ], "group_index_range": { "chosen": false, "cause": "not_single_table" }, "skip_scan_range": { "chosen": false, "cause": "not_single_table" }, "analyzing_range_alternatives": { "range_scan_alternatives": [ { "index": "PRIMARY", "ranges": [ "pk < 113" ], "index_dives_for_eq_ranges": true, "rowid_ordered": true, "using_mrr": false, "index_only": false, "rows": 2, "cost": 0.71, "chosen": true } ], "analyzing_roworder_intersect": { "usable": false, "cause": "too_few_roworder_scans" } }, "chosen_range_access_summary": { "range_access_plan": { "type": "range_scan", "index": "PRIMARY", "rows": 2, "ranges": [ "pk < 113" ] }, "rows_for_plan": 2, "cost_for_plan": 0.71, "chosen": true } } } ] }, |
substitute_generated_columns은 컬럼 처리 방식으로 table_dependencies에는 테이블의 의존 관계가 나타나 있다. 이는 outer join에서 의미가 있는 항목이다. outer join에는 depends_on_map_bits에 의존하는 테이블의 map_bit가 표시된다.
ref_optimizer_key_uses에는 이쿼리에서 이용 가능한 인덱스이 목록이 나열된다.
rows_estimation에는 접근한 테이블의 행 수가 출력된다. 또한 테이블 스캔을 실행할 때의 비용을 알 수 있다.
| { "considered_execution_plans": [ { "plan_prefix": [ ], "table": "`t1`", "best_access_path": { "considered_access_paths": [ { "rows_to_scan": 10, "filtering_effect": [ ], "final_filtering_effect": 1, "access_type": "scan", "resulting_rows": 10, "cost": 1.25, "chosen": true } ] }, "condition_filtering_pct": 100, "rows_for_plan": 10, "cost_for_plan": 1.25, "rest_of_plan": [ { "plan_prefix": [ "`t1`" ], "table": "`t3`", "best_access_path": { "considered_access_paths": [ { "access_type": "eq_ref", "index": "PRIMARY", "rows": 1, "cost": 3.5, "chosen": true, "cause": "clustered_pk_chosen_by_heuristics" }, { "access_type": "range", "range_details": { "used_index": "PRIMARY" }, "chosen": false, "cause": "heuristic_index_cheaper" } ] }, "condition_filtering_pct": 100, "rows_for_plan": 10, "cost_for_plan": 4.75, "chosen": true } ] }, { "plan_prefix": [ ], "table": "`t3`", "best_access_path": { "considered_access_paths": [ { "access_type": "ref", "index": "PRIMARY", "usable": false, "chosen": false }, { "rows_to_scan": 2, "filtering_effect": [ ], "final_filtering_effect": 1, "access_type": "range", "range_details": { "used_index": "PRIMARY" }, "resulting_rows": 2, "cost": 0.91, "chosen": true } ] }, "condition_filtering_pct": 100, "rows_for_plan": 2, "cost_for_plan": 0.91, "rest_of_plan": [ { "plan_prefix": [ "`t3`" ], "table": "`t1`", "best_access_path": { "considered_access_paths": [ { "rows_to_scan": 10, "filtering_effect": [ ], "final_filtering_effect": 1, "access_type": "scan", "using_join_cache": true, "buffers_needed": 1, "resulting_rows": 10, "cost": 2.25, "chosen": true } ] }, "condition_filtering_pct": 100, "rows_for_plan": 20, "cost_for_plan": 3.16, "chosen": true } ] } ] }, |
considered_execution_plans 은 옵티마이저가 검토한 실행 계획을 배열로 표시한다.
plan_prefix는 지금까지 접근한 테이블을 나타낸다. 처음에 접근하는 테이블의 plan_prefix는 당연히 비어있다.
table 맴버는 현재 검토하고 있는 테이블을 가리킨다.
best_access_path는 가장 효율적인 접근 방식을 착기 위해 어떤 접근 방식을 검토했는가를 표시하고, 검토한 접근 방식은 considered_access_paths에 정리 되어 있다. 선택된 것은 chosen 맴버가 true인 것으로 알 수 있다.
condition_filtering_pct는 테이블에서 행 데이터를 패치한 이후에 적용된 where 절의 조건으로 어느 정도 행의 범위 축소가 일어났는지를 예상한다. 여기서는 100%로 되어 있기 대문에 범위 축소가 전혀 일어나지 않았다.
rest_of_plan은 이후의 테이블 접근 정보가 저장된다. 여기서는 조인한 경우를 알 수 있다.
두 개의 실행계획을 색으로 분리 하였다. t1->t3 조인 방법은 cost 4.75, t3->t1 조인 방법은 cost 3.16 이 소모된다.
| { "attaching_conditions_to_tables": { "original_condition": "((`t1`.`c1` = `t3`.`pk`) and (`t3`.`pk` < 113))", "attached_conditions_computation": [ ], "attached_conditions_summary": [ { "table": "`t3`", "attached": "(`t3`.`pk` < 113)" }, { "table": "`t1`", "attached": "(`t1`.`c1` = `t3`.`pk`)" } ] } }, { "finalizing_table_conditions": [ { "table": "`t3`", "original_table_condition": "(`t3`.`pk` < 113)", "final_table_condition ": "(`t3`.`pk` < 113)" }, { "table": "`t1`", "original_table_condition": "(`t1`.`c1` = `t3`.`pk`)", "final_table_condition ": "(`t1`.`c1` = `t3`.`pk`)" } ] }, |
attaching_conditions_to_tables는 추가로 적용될 where 절의 검색 조건을 정리한다.
| "refine_plan": [ { "table": "`t3`" }, { "table": "`t1`" } ] } ] } }, { "join_execution": { "select#": 1, "steps": [ ] } } ] } MISSING_BYTES_BEYOND_MAX_MEM_SIZE: 0 INSUFFICIENT_PRIVILEGES: 0 1 rows in set (0.00 sec) |
refine_plan은 join_optimization의 마지막 항목이다. 단순히 어떤 테이블에 접근 했는지를 나타낸다.
MISSING_BYTES_BEYOND_MAX_MEM_SIZE는 옵티마이저 트레이스를 잘라낸 부분을 표시한다. 0이므로 잘라낸 부분이 없다. 만일 메모리가 부족하여 일부를 잘라내게 되면 이곳에 몇 바이트를 잘라냈는지 표시한다. 메모리의 크기는 optimizer_trace_max_mem_size 로 지정한다. 기본값은 16KB (8.0.18 기준 1MB)이다.
'MySQL' 카테고리의 다른 글
| mysql 벤치 마크 툴 sysbench (0) | 2020.04.16 |
|---|---|
| MySQL benchmark tool ( MySQL 성능 테스트 툴 ) DBT2 (0) | 2020.03.19 |
| MySQL EXPLAIN ANALYZE (0) | 2019.10.02 |
| MySQL Hash Join Optimization (0) | 2019.10.02 |
| MySQL 시퀀스(AUTO_INCREMENT) 조회 및 초기화 (0) | 2018.09.18 |